Using the SaxionApp as a library
Competence: I am able to create a new Java project using IntelliJ and include a library (if needed).
Competence: I understand how Java I/O works with regards to the console and how to read data from csv files using the Scanner class.
Competence: I understand the concepts of static and non-static variables and methods, and can apply these principles to my own code.
Introduction
Since you started programming (with us), you have used SaxionApp statements to handle most common input / ouput operations (I/O), like printing texts, drawing shapes and retrieving input from a user. But, as you probably figured by now, the SaxionApp functionality is not included in any default Java installation. It is a (software) library that we included for you to make your life easier while learning what programming is all about. You can best compare libraries to a collection of predefined classes (and methods) and the use of these libraries is common in software development.
It is now however time to take away your training wheels and expose you to Java without the SaxionApp and treat the SaxionApp as what it is: a library. And libraries should only be included when required. So from now on, we’ll only use the SaxionApp for what it is most useful for: creating graphical user interfaces. And all exercises that do not require this, no longer need to include this library. This week we’ll show you how to do all of this.
Besides practicing on creating projects and adding libraries, we’ll also discuss a new OO concept this week: static. Static variables and methods distinguish themselves from normal variables and methods in that they say something about an entire class rather than about an instance of said class. Today we’ll teach you exactly what this means and what you can use static for.
Creating a new project
Starting this week we are no longer providing templates for the exercises: you are to create your own Java based (IntelliJ) projects for each individual exercise. We will leave the tutorial on how to create a basic Java project here, as there are plenty of tutorials / guides online to be found. Just make sure you stick to the following rules (which are most likely your default settings):
- You should create a Java project.
- IntelliJ also supports different programming languages like Kotlin.
- Please use IntelliJ as build system.
- Gradle and Maven are not yet useful in this course.
- The use JDK level 21 is preferred.
For a more visual description, please look here.
Also, make sure you think about where you want to store your projects. Don’t leave projects lying around in your “Downloads” folder. It’s quite easy to make a complete mess of your work, try to prevent this!
The ChillyGame you might have started last week also provides a description on how to create a project, including how to add the SaxionApp as a library. So if you are still unsure on what to do, feel free to look at this guide (again).
How to do stuff without the SaxionApp
In this chapter we will discuss how to do certain things that you have been using over the past few weeks and you most likely consider easy, like printing something to the screen was SaxionApp.printLine(..), reading an integer from a user was SaxionApp.readInt(), etc.
However, all these functions are not available by default in Java and they were actually built by us to make sure you didn’t have to worry about things that we did not want you to worry about just yet.
Take for example the readInt() method that you used to get an integer input from the user. You’ve probably tried at some point to enter enter a word (String), letter (char) or maybe even a floating point value (double) instead of the required integer input. The SaxionApp, at that moment, would produce an error message before allowing you to enter a different value.
This is not standard Java behavior: if you type a word (String), while instructing the computer to read in an integer, your computer determines something is wrong and throws an exception. (Remember exceptions from last week?)
The same goes for printing: we wrote SaxionApp so that you didn’t have to worry about printing with with colors or at different positions in the screen. This is not standard behavior either. To use colors you need something of a color screen (which is not default) and to change the position, the system needs to understand coordinates. Because the standard Java output knows nothing of colors (or coordinates) we had to implement this. And we can go on like this for a while!
As quite a bit of time went into creating the SaxionApp it is not something we can ask you to rebuild easily. We will therefor still use the SaxionApp library whenever we need it. However, certain things we can do without the need for the SaxionApp. These are:
- Being able to write plain text and any error messages to something called the console (or terminal as you might also know it).
- Being able to read data of a certain type (
int,String,double, etc.) from this console. - Being able to read data from a file. (With this we will replace the
CsvReaderpart of theSaxionApp.)
Note that for all exercises that require some drawing, you should include the SaxionApp library yourself.
All other exercises should, from now on, be done on the console instead.
The console a.k.a. prompt a.k.a terminal a.k.a shell…
By default, Java will use the console to interact with the user. This console goes by many different names, such as command line prompt (Windows), terminal (Mac / Linux), prompt, magic black screen thingy, etc. Probably at this moment in your career, you have seen it before.
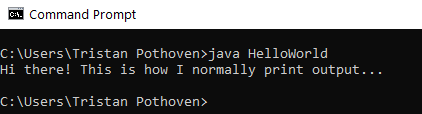
At the command prompt you can give instructions to your operating system and from your code it is possible to print lines to it. There are quite a few more interactions possible with the command prompt that we will ignore for now.
The reason we don’t need to discuss this is because IntelliJ itself has its own console, which makes working with the console much easier. In the past few weeks you have seen this console many times (especially when your program crashed), but probably only rarely used it to interact with your program. The console in IntelliJ is found (by default) at the bottom of your screen and it is displayed every time when you start a Java program.
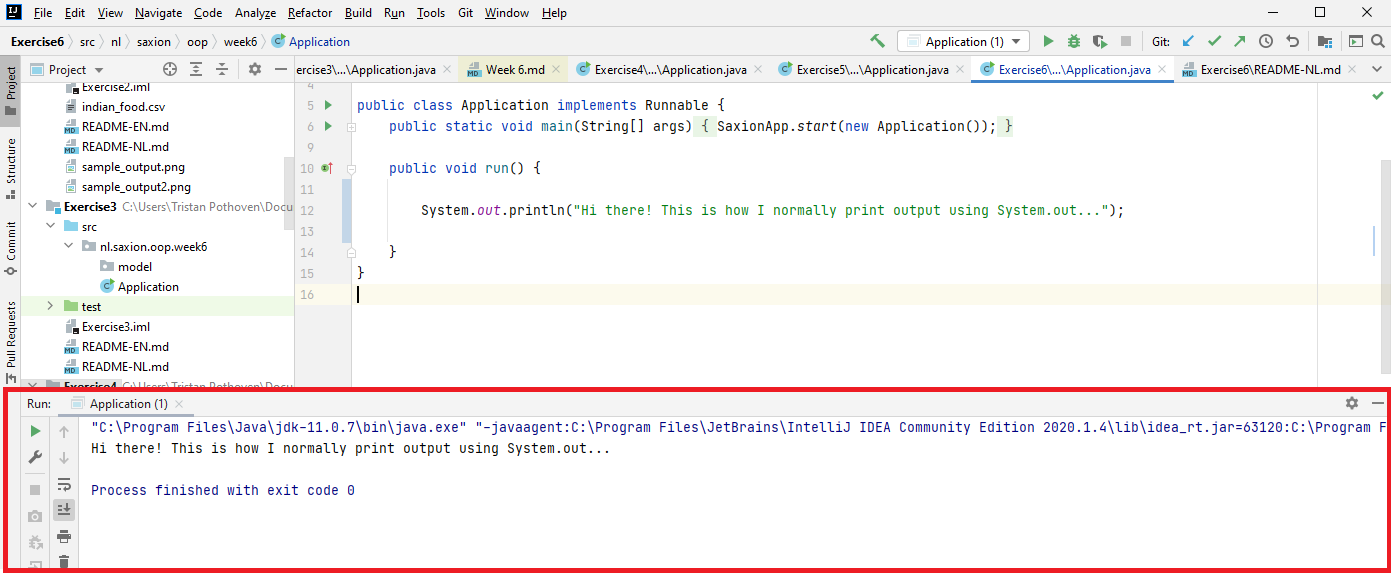
However, the use of the console differs from what you are used to with the SaxionApp. Whereas with the SaxionApp you could only write to just one “output” (the screen) using SaxionApp.printLine(..), you now suddenly have the ability to do this in multiple ways.
Writing to the console: System.out and System.err
For now, we will look at the two most common methods of printing to the console: System.out and System.err.
The first is very similar to what you have used with the SaxionApp:
System.out.println(..), the abbreviation within IntelliJ for this issout(just type it in!).System.out.print(..), there is no abbreviation for this.
Note that the difference between previous calls is in the addition of “ln” to the first call. The behavior of this
is exactly the same as the difference between SaxionApp.printLine(..) and SaxionApp.print(..); in the first version, a new line is added at the end of the text (also called a newline) and the second version does not include this newline.
Intermezzo: Printing newlines
There are also special characters to display a newline, so you can enter multiple lines in a single print job. Different characters have been devised for this, depending on the operating system. Unix(-based) systems almost always use the character \n (note this is considered 1 character), Windows(-based) systems use \r\n (two characters).
Note that the backslash in a char or a String is used as a so-called escape character. The backslash is followed by something with a special meaning, where the “n” stands for a new line (and the “r” for the fact that the cursor should be reset). See also Java documentation: Character and the following example that works only under Unix:

Output:
Hi!
This is a multiline
example where you
can see what a newline
is!
Because of the difference between \n and \r\n you may possibly think that you are now going to write code that works either for Unix or for Windows but not both, and although technically this is true, Java has a simple solution for this in the form of the method: System.lineSeperator(). Depending on your OS, this method returns the appropriate characters to break a sentence. So try to get used to not inserting these characters yourself, but using this method where necessary.
The added value of this newline character is best seen when combined with the use of the toString() method. Consider the following example:
public class StudentGroup {

    private String groupName; // e.g. "EHI1V.Sa" or "DHI1V.So"
    private ArrayList<Student> listOfStudents;

    // Omitted the rest, but you may assume that we load in a list of students with a proper toString implementation.

    @Override
    public String toString() {
        String lineSep = System.lineSeperator();
        String result = "Student group: " + groupName + lineSep;

        for(Student s : listOfStudents) {
            result += s + lineSep; // Note that we now call the "toString" method from Student. We added a line seperator to the line to put each student on a new line.
        }

        return result;
    }
}
(Note: officially, it is better to use a StringBuilder when creating these kinds of toStrings, but we’ll ignore this for now! If you want to know more about this, see Java Tutorials: The Stringbuilder Class.)
For printing to the console, we just used the public attribute out of the class System. This always refers to the “normal output device” attached to your system e.g. the console.
However, in addition to System.out, you have another output to potentially print to: System.err. You use the same methods to write to System.err as you use with System.out, i.e. println(..) and print(..). The err attribute however, refers to the place where you would like to see errors. By default, this is also your console, but IntelliJ displays text that you send to System.err in red! This way, you can easily distinguish “normal” output and “errors”.
The reason we’re pointing out this distinction is that we’d like to you to train yourself in making this distinction: regular output (such as printouts to the user, overviews, etc.) is printed with System.out, all errors (e.g. exceptions) should be sent to System.err.
In addition to System.out and System.err, your system has a third interesting channel that we are going to make use of: System.in. It may not surprise you, but System.in is associated with your default input device, which in almost all cases, is your keyboard.
Intermezzo: String.format(…), String.formatted(…) and System.out.printf(..)
Now that we’re going to have more data printed in the console, it’s a good idea to take a look at ways to format this text somewhat decently. And although formatting is used a bit broadly in this context (we’re really not going to underline or bold words on the console), there are some handy things we want to make you familiar with.
For example, consider a store receipt. You’ve probably noticed before that the numbers are (generally) neatly aligned from top to bottom so that the sum of all products is properly aligned. This is because some white space has probably been left behind the product name listed which matches the amount of space needed to align everything. For instance the product “cheese” needs significantly more white space than “cotton swabs”, etc. Not to mention that some names are abbreviated because they are too long anyway.
To easily solve these problems, most programming languages offer the option of casting String values into a certain format, where you should think of a format primarily as “the rest of the sentence into which a value should fit.”
For example, take the following example.
System.out.printf("%s is currently %d years old", "Tristan", 39)
The above String "%s is currently %d years old" is the format in which the values “Tristan” and 39 must be put in a particular place. In this case, %s represents a String value and %d represents a number (digit). So the %-values actually indicate places, which are filled in with the values of the remaining arguments. Of course, these arguments may also come from variables (or methods).
The above printf statement has the side effect of printing the result. However, you can also construct a String variable by using the format(..) and formatted(..) methods.The examples below have a similar effect:
String result = "%s has %d dogs with an average age of %f".formatted("Tristan", nrOfDogs, getAvgDogAge());

// This line is identical to the line above, BUT uses a static method. We'll discuss static later in this document.
String result2 = String.format("%s has %d dogs with an average age of %f", "Tristan", nrOfDogs, getAvgDogAge());
The nice thing about working this way is that you no longer have to do String concatenation with + symbols and you can add a new line at any time by including %n in your format string.
More examples can be found here. The official documentation can be found here.
Using the Scanner to read data from your keyboard
The major problem with the System.in class is that you cannot read typed data. It is only possible to read in the literal bytes generated when you type a letter on your keyboard. So some work must be done to convert those keystrokes into values of a certain type (such as int, String, etc.).
Fortunately, Java has the class Scanner (click the link to go to the official page!), which can perform many of these functions for us while reading data. For this module, however, we want to keep it simple and use only 1 method to read data: nextLine().
For example, to read out a sentence from the user you can use the following code:
Scanner consoleScanner = new Scanner(System.in); // Link the "Scanner" to System.in, it will now listen to your keybord.

String input = consoleScanner.nextLine(); // Read a value from the console.
Then, if you want to turn this input into a different data type, you will have to parse it. Parsing is a process that analyzes the input (in this case, text) and converts it to some other format. Most of the data types you’ve used before have parsers by default in Java. The main methods by which you can parse data (and which you should remember) are:
Integer.parseInt(String input)Double.parseDouble(String input)Boolean.parseBoolean(String input)
So if you want to read in a number via an instance of the Scanner class, this looks like this:
Scanner consoleScanner = new Scanner(System.in);

System.out.print("Please enter a numerical value: ");
String inputString = consoleScanner.nextLine();
int intValue = Integer.parseInt(inputString);
Depending on the type of parse method you call, the method may well throw a NumberFormatException if you try to parse something that is not convertible to a particular type. You will run into this naturally in the commands and is easily solved with a try { ... } catch (...) block as you learned last week.
Note that by executing the nextLine() method your console will start waiting for input (as you may be used to). On your console, however, this is not always very visible… so if you are looking at a “blank screen,” ask yourself if no input is being requested.
About nextInt(), nextDouble(), etc.
If you read the documentation of the Scanner class carefully, you will see that it also provides a number of auxiliary methods such as nextInt(), nextDouble() and nextBoolean(). The reason why we choose not to use these methods is because these methods sometimes have some side effects that are not always easy to understand. Therefore, to keep the explanation as simple as possible (and not have to discuss all the exceptions) we recommend you use the above approach of first reading data in as String and then parsing it.
Despite it’s learning curve, the Scanner class is convenient as it can also read data from other sources the same way it does from the console. And so we can replace the CsvReader from the SaxionApp with it.
Replacing the CsvReader
To replace the CsvReader from the SaxionApp we will first need to understand what it actually does. First, the reader opens a file and reads this file line by line using the loadRow() method. After reading a line, it is then automatically processed and split into an array of (String) elements. The elements are then individually accessible using the getInt(...) or getString(...) methods. Type conversions are done automatically by the appropiate get methods.
This week we’ll keep it slightly simpler, but use the same strategy.
Consider the following piece of CSV data (in a file called csv-data.csv):
firstName;lastName;studentNr
Tristan;Pothoven;001234
Evert;Duipmans;004234
Craig;Bradley;006212
Ruud;Greven;016324
//..etc.
If we want to parse a file, line-by-line, using the Scanner class, we can do this like:
Scanner fileReader = new Scanner(new File("csv-data.csv"));

// We'll skip the first line (header), so we don't store the output from nextLine!
fileReader.nextLine();

while (fileReader.hasNext()){ // You can ask the Scanner if there is a next line! Check out the documentation!
    String lineInFile = fileReader.nextLine(); // Read the line into memory..

    System.out.println(lineInFile); // Just print it for now..
}

fileReader.close(); // Close the file after use.
Notice that we are using new File("csv-data.csv") now as constructor argument for creating a Scanner instance, rather than System.in. By doing so, we are now binding the Scanner instance to an actual file (csv-data.csv). Therefore, this file must
exist (and should be accessible) for our program. If not, a FileNotFoundException is thrown with which Java says that the the file cannot be found the specified location (or cannot be accessed). We’ll deal with this exception later in the course!
Please note that the variable lineInFile contains a String (Tristan;Pothoven;001234) which we now need to process ourselves. First, we want to split this total String and then use the individual parts as attributes in our objects. The String class (click on the link) fortunately provides some functionality to do so by means of the split(String regex) method, where you may consider “regex” as the separator character. From this method comes a String[] (String array) with all the individual blocks that we can now use:
// Assume the file reading code is here as well..

String[] lineParts = lineInFile.split(";"); // Split the entire line based on the ; character.
String firstName = lineParts[0]; // "Tristan"
String lastName = lineParts[1]; // "Pothoven"
int studentNumber = Integer.parseInt(lineParts[2]); // 001234, We'll discuss this line next!
Because the split method returns a String[], processing the first two fields, where we only are looking for String values is not difficult: these are already in the array and are of the right type. However, before treating the the student number as an integer the actual String needs be converted (also known as parsed…). And that is something for which you need a helper method that Java offers by default in the form of Integer.parseInt(String s). This method will try to turn the provided String into a number.
If it cannot do so? Then a NumberFormatException is thrown, by which Java indicates that it is unable to parse the actual value.
The same parseXXX(String s) methods also exist for doubles and booleans in the form of Double.parseDouble(String s) and Boolean.parseBoolean(String s). (And there are others as well!)
Let’s finish the example by including the techniques mentioned above:
 public ArrayList<Student> readStudents(String file) {
    ArrayList<Student> result = new ArrayList<>;

    try {
        Scanner scanner = new Scanner(new File(file));

        // Skip header row
        scanner.nextLine();

        while (scanner.hasNext()) {
            String lineFromScanner = scanner.nextLine(); // Read the entire line
            String[] lineParts = lineFromScanner.split(","); // Break it into parts

            String firstName = lineParts[0];
            String lastName = lineParts[1];
            int studentNumber = Integer.parseInt(lineParts[2]); // Parse the String into an int.

            Student s = new Student(firstName, lastName, studentNumber); // Let's assume this exists!
            result.add(s);
        }

        scanner.close();
    } catch (FileNotFoundException ex) { // Note that this exception MUST be caught. We'll discuss later why.
        System.err.println("Cannot find CSV file: " + ex);
    }

    return result;
}
In contrast to the earlier use of the Scanner (in combination with System.in) you might have noticed that for files, we choose to close the file as soon as we are finished using the close() method. This is a matter of proper programming: when you connect to an external resource, you should close it. However, the reason why we don’t do this for System.in is that you cannot re-open this connection after you have closed it. So once you close System.in you can’t read anything from your keyboard during the rest of the application.. which is often annoying. It is therefore better to just forget to close System.in, but you should close all other connections properly.
Note that the FileNotFoundException must be caught. This is because this exception is a so called “checked exception”, but we’ll go into this in more detail later in this course. For now, you may just use this example in your own assignments.
And that’s it! Congratulations, you have basically created your own CsvReader.
Starting your program: the main(...) method.
The last issue we need to resolve when creating a new project is to understand where the first line of code of your program needs to go. (So what’s the first line the computer will execute?)
Every program you write needs a starting point. And in Java, that starting point is a method called the main method. You’ve already seen this method in all your exercises so far:
public static void main(String[] args) {
    SaxionApp.start(new Application()); // This might look a different if we included a screen size.
}
It is mandatory that this method always looks the same: Java is very strict about this. Where methods normally are completely free to design (you can choose the name, arguments and return type), the main method is rather strict.
So let’s dissect the main method:
public static void main(String[] args) { .. }
The main method does not have a return type (void), but it does get an argument in the form of a String[]. In this array, Java stores any commandline arguments that were provided when the program was started. As we won’t use commandline arguments in this course, we won’t discuss all details about them here, but it is good to know that you know that you can provide them. For example you could provide file names for files from which data should be read or where data should be stored.
public class Arguments {

    public static void main(String[] args) {
        for(String argument : args) { // Print everything in the "args" array.
            System.out.println(argument);
        }

        // More code could go here..
    }

}
And if you use this to provide commandline arguments:

From now on, you may write your code directly in the
mainmethod of your programs.
What we haven’t talked about yet is that the main method also contains the keyword static. This means that the main method should always be called on a class and not on an individual object. What this actually means is discussed next.
Static vs non-static
This course you have written many methods that are directly related to the instances of this class within which the methods are defined. For example consider the method getName() of a Person class: you expect this method to return the name of the person represented by that instance. We also call this fact that the method is context
dependent (usually you are using this as well). The values of the attributes in the object determine the value that is returned by the method call.
public class Person {
    private String name; // This attribute will have a value specific to this instance!

    public Person(String name) {
        this.name = name;
    }

    public String getName() { // This method is context-specific!
        return name;
    }
}
You might imagine that there are also methods that do not depend on the context (or the content) of an object. These methods are also called contextless or static methods (represented by the word static in code). Most of the methods you wrote in the Introduction to Programming course were in fact contextless (and could be made static, but we chose not to do so).
Static methods always exhibit the same behavior at invocation, no matter what the state of a given object is.
For example, consider the following method:
public static int sum(int[] input) {
  int result = 0;

  for(int value : input) {
    result += value;
  }

  return result;
}
The method sum(int[] input), as shown above, does not depend on any values besides the arguments: The only relevant information needed for this method to function is the contents of the argument.
From now on, we would like you to make all methods
staticthat do not require any context, meaning that you confirm the method does not require context.
In addition to the sum method, you can probably imagine that there are some other similar methods that might be useful, when working with integer arrays, such as for example: calcAverage (to calculate an average), findMin (to find the smallest value), findMax, etc. Since we want to use this functionality more often, we obviously should choose to put these methods into a so-called Utils (short for utilities) class.
public class IntArrayUtils {
    public static int sum(int[] input) { ... }

    public static double calcAverage(int[] input) { ... }

    public static int findMin(int[] input) { .. }

    public static int findMax(int[] input) { .. }
}
The question you should now ask yourself with this class is: Why would you want to create instances this class? The class does not contain any internal attributes and, in fact, the class is just a file to put in useful methods. The methods are all made static as well! And thus, you do not need an instance of the class IntArrayUtils to be able to use the methods. This then looks like this:
int[] numbers = { 5, 2, 7, 7 }; // Suppose these numbers are from some caluation.

int sum = IntArrayUtils.sum(numbers); // Just call the method directly on the class instead of an object!
In the previous example, we also call the fact that the methods are now attached to the class and not so much to any objects you can create from the class. It is best to imagine this as a high-level property: static methods (and variables) are linked to entire classes, non-static methods (and variables) to objects (or instances).
Now take the class Person mentioned above. Suppose you want to provide your program with functionality that allows you to read data from a CSV file, e.g. in the form of the method readPersonsFromFile(String fileName). This functionality has to do with this Person class. Namely, you want to convert text (from the CSV file) to different Person instances. Therefore, for the readability of your program, it is convenient to include this method in the Person class. Only, the method readPersonsFromFile(String) is not bound to a specific instance, in other words, it belongs to the actuall class and thus you should make this method static.
This could look like:
public class Person {
    private String name; // This attribute will have a value specific to this instance!

    public Person(String name) {
        this.name = name;
    }

    public String getName() { // This method is context-specific!
        return name;
    }

    public static ArrayList<Person> readPersonsFromFile(String fileName) {
        // See earlier examples on how to use the Scanner to read files!
    }
}
Note that the method is still included within actual Person class (between the curly brackets): thus, the method is really a part of this class, but does function on a different level.
In your code, you can now use this method like:
public class Application {

    public static void main(String[] args) {
        ArrayList<Person> listOfPersons = Person.readPersonsFromFile("persons.csv");
        // Do stuff..

    }
}
Note that the method is thus called via the actual class Person and not via an individual instance. The big advantage of this approach is that you do not require any instance and that you can now also just store the functionality that has to do with the class Person in the right place. This means that finding this particular method later is much easier!
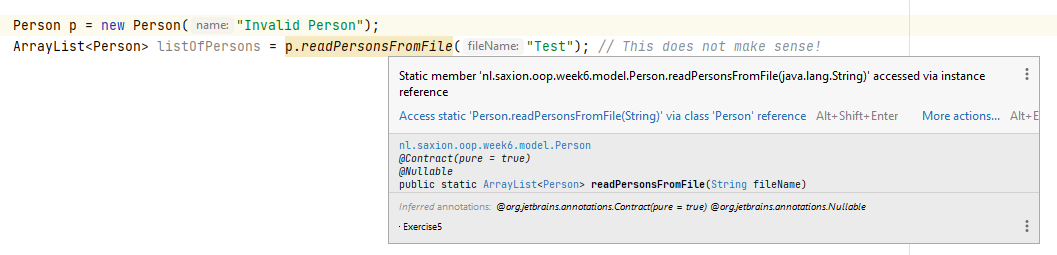
You could also call static methods through an instance of the object, but this is strongly discouraged. If you do this in IntelliJ, you will get the following warning:
The keyword static can also be used on attributes of a class. A static attribute can be seen as a variable that is shared by all instances. This is especially useful whenever you want to create some class constants or declare other values that might have a special meaning inside a class.
Let’s consider an example where we talk about a legal age of a person (so at what age is this person considered to be an adult).
You can declare such a variable like:
public class Person {
    public static final int LEGAL_AGE = 18;

    // Omitted other code..
}
(The word final means to make a variable behave like a constant, so after this variable is created, you are not allowed to change it’s value. We’ll talk more about this keyword later in the course.)
In your code, using LEGAL_AGE looks like this:
int readAgeFromUser = ..; // Determine age via interface or Scanner

if(readAgeFromUser < Person.LEGAL_AGE) {
    // We know now this person is not yet of legal age!
}
Obviously you can also replace the variable directly with the value 18, but if the law ever changes, you’ll have to replace this value in all places where you use it. Using a (static) variable as a constant means that you only need to implement one change, which is much easier! (And as a benefit, it makes your code also more readable!)
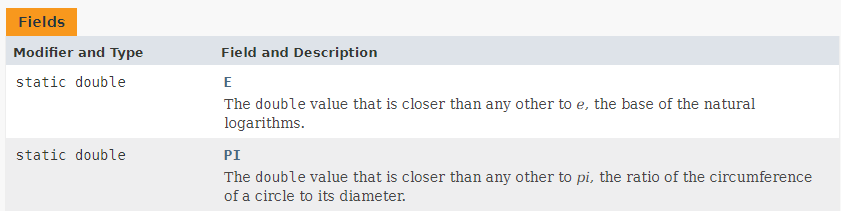
Within Java you may already have seen more places where you encountered static attributes. For example in the (utility!) class Math. The value of pi is defined in this class and you can use it in all places in your code by using Math.PI. The attribute PI is declared as public static final variable in the class Math.
LocalDate, LocalTime, LocalDateTime, Instant, Duration and Period
Thanks to the use of static methods, we can now also utilize another type of class, namely those whose constructors are (for whatever reason) restricted from direct use. Take, for example, the SaxionApp itself; this class has no public constructor, mainly because we do not want you to instantiate it yourself. (We will leave the reasons for this aside for now.)
There are more classes in Java that work this way, one of the most well-known being LocalDate, LocalTime, and LocalDateTime, which are used to represent a specific day (LocalDate), a specific time (LocalTime), or a combination of the two (LocalDateTime). There are several reasons for this design choice, the most important of which for now is that there are simply a lot of rules when working with time that are not always logical for computers.
Think about it: how is a computer supposed to know that there are 364 OR 365 days in a year (depending on a leap year), that these days are spread over 12 months, each of which can have 28, 29, 30, or 31 days, with each day consisting of 24 hours, each hour having 60 minutes, and each minute being 60 seconds long, culminating in the fact that each second is also 1000 milliseconds?
To handle this properly as a programmer, Java has devised a construct to make it easier to work with. One of the decisions made in this regard is to disable standalone constructors. You will no longer create a day/month/year yourself; instead, we will ask the specific class to provide an instance that represents a particular moment.
Here’s an example:
// Obtain an instance of LocalDate, representing 31st of December, 2024
LocalDate endOfYear = LocalDate.of(2024, 12, 31); // year, month, day

LocalTime noon = LocalTime.of(12, 0); // hour, minute

// Get the champagne at January 1st 2025, at 0 hours, 0 minutes, 1 second.
LocalDateTime timeForDrinks = LocalDateTime.of(2025, 1, 1, 0, 0, 1); // year, month, day, hour, minute, second
The real benefit of this setup becomes apparent when you start using these datatypes. For example, consider the questions “What date is exactly one week after April 28?” or “What time is 93 minutes after 15:20?”. Of course, all of this can be programmed manually, but that is quite laborsome.
The classes LocalDate, LocalTime, and LocalDateTime are therefore equipped with various handy (helper) methods that can assist you in your further programming, such as:
LocalDate someDate = LocalDate.of(2024, 5, 15); // year, month, day

System.out.println(someDate.getDayOfWeek()); // Will result "WEDNESDAY".

// Create a starting point - it's a Sunday btw.
LocalDate april28 = LocalDate.of(2024, 4, 28);

// Add 1 week (e.g. 7 days) to this moment. Notice that it returns a new instance.
LocalDate april28PlusWeek = april28.plusWeeks(1);

System.out.println(april28PlusWeek); // 2024-05-05
System.out.println(april28PlusWeek.getDayOfWeek()); // Still Sunday
(Besides plusWeeks(long) you obviously also have plusDays(long), minusWeeks(long), etc.)
The class LocalTime uses pretty much the same terminology, except for it’s focus on hours: plusHours(long), plusMinutes(long), etc.
LocalTime start = LocalTime.of(15, 20); // Create an instance for 15 hours, 20 min (so 15:20).
LocalTime later = start.plusMinutes(93); // Add 93 minutes to 15:20

System.out.println(later); // 16:53

LocalTime bitForMidnight = LocalTime.of(23, 57, 22); // 23 hours, 57 minutes, 22 seconds
LocalTime afterMidnight = bitForMidnight.plusSeconds(5000);
System.out.println(afterMidnight); // 01:20:42 <-- Trust us..
The class LocalDateTime is a combination of the previously mentioned LocalDate and LocalTime classes. We encourage you to check the Javadoc of this class for examples.
Instant
If you find yourself in a situation where you want to do something with timestamps, but you don’t really care about the specific days/ hours/ years associated with them, you can also choose the Instant class. You can think of this class as a moment in time, where you don’t really care about the details of this moment. For example, consider a task where you need to measure time (e.g., for a calculation). In this case, it doesn’t matter to you when this moment is exactly (what day it is, what time it is, etc.), and you often don’t need to use this information directly. Generally, Instant is seen as a somewhat simpler variant for storing time.
Duration and Period
The last classes we haven’t discussed yet are about the distance between two moments, or “duration.” In Java, we use the following two classes for this: Duration, for measuring a duration in hours, minutes, and seconds, and Period if you want to know the duration in days, months, or even years.
The classes are quite similar in usage, but the main difference lies in the accuracy of what you want to know. You primarily use Period instances to determine longer periods based on dates, expressed in days, months, and years. You use Duration instances to measure shorter periods on a more precise scale, such as in hours, minutes, and (milli)seconds.
Both classes can be used in a similar way, with a focus on the static method between. This looks as follows:
LocalDate startOfMonth = LocalDate.of(2025, 1, 1); // 1-1-2025
LocalDate randomDate = LocalDate.of(2025, 1, 16); // 16-1-2025

Period period = Period.between(startOfMonth, randomDate);
System.out.println(period.getDays()); // Prints out '15'

LocalTime startOfDay = LocalTime.of(0, 0); // Start of the day
LocalTime randomTime = LocalTime.of(14, 59, 12); // Somewhere in the afternoon

Duration duration = Duration.between(startOfDay, randomTime);
System.out.println(duration.toSeconds()); // Prints out '53952', which represents all seconds in this duration. "getSeconds" behaves the same.
System.out.println(duration.toSecondsPart()); // Print out '12', which is the remaining number of seconds in this duration, excluding the hours and minutes. You can make the same distiction for minutes and hours.
Although the principle we described above sounds relatively simple (and it certainly is!), there are still a number of interesting choices that we won’t cover all here. Therefore, it is advisable to take a look at the Java documentation pages for the previously mentioned classes. Here you will also find useful examples that will definitely help you when writing code that makes use of dates and times.
Videos
