1.4-Software-Development-Principles
Storing data with JDBC
Introduction
Since we are learning to store data, we might as well use an actual database. You have learned to ask question of a database through the use of SQL. The application that allows you, in the role of a database designer, to execute queries is usually called “the administrator”. (pgAdmin, phpMyAdmin, etc.) Such an application may be a stand-alone app, or part of a browser application. The actual database runs in a separate process, possibly on a different machine.
In stead of designing queries in an administrator, this segment teaches you the way in which a Java application can send those queries to the actual database server directly.
Please note that normally you can easily follow along. In this case I’m connecting to a database that you may not have on your system. So you must adapt the examples to your database server.
Step 1: Connecting to the database
To communicate with the actual database server we need to setup the database connection. We’re going to connect to a postgres system, but another database works roughly similar.
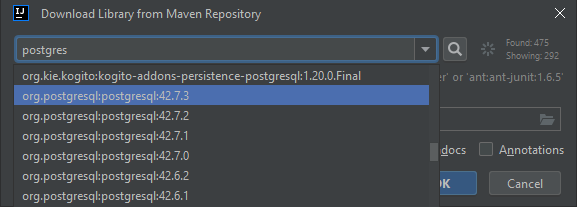
Once installed we can configure the connection to postgres:
String url = "jdbc:postgresql://localhost:5432/test?user=adm&password=adm&ssl=true";
Connection conn = DriverManager.getConnection(url);
The main complexity is located in the connection url:
jdbc:- We want to connect using a JDBC protocol.postgresql- We are connecting to a postgres database.://- Just like any URLlocalhost- The hostname to which we want to connect:5432- The standard Postgres server port. (If you changed this you must use another value.)/test- Name of the database to connect to.?- Specific parameters follow after the question mark.user=adm- Username&- Additional parameterspassword=adm@saxion.nl- Password&- Additional parametersssl=true- Use a secure connection.
To connect to a mysql database on my home server the same url would look something like this:
String url = "jdbc:mysql://192.168.1.1:3306/energy?user=frederik&password=Secret1234&ssl=true";
Connection conn = DriverManager.getConnection(url);
For security purposes you can supply the username/password separately as well:
String url = "jdbc:mysql://192.168.1.1:3306/energy";
Connection conn = DriverManager.getConnection(url, "frederik", "Secret1234");
Note: Once you’re done with the
Connectionplease make sure that you close the connection:conn.close();
Step 2: Send a query
Sending a query should be executed with three steps.
- Prepare the query
- Bind the actual values
- Send the query
String query = "SELECT * FROM students WHERE number=?";
PreparedStatement statement = conn.prepareStatement(query);
Please note that the query contains a ‘?’. This marks the location where you can choose to assign a value using step 2:
statement.setInteger(1, 123456);
Note: In this case we’re binding an integer value to the first parameter in the query. It’s counted from 1, not 0.
If this value had been a text value you could use:
stamement.setString(1, "Hello");This is the only difference, the query text without any quotation marks remains the same!
Finally you can actually execute the query, together with its data:
ResultSet resultSet = statement.execute();
If you forget to set all of the parameters, the system will notify you with a nice exception.
Note: The reason to use these three steps, in stead of just including the data in the query text, is as follows: This method prevents any form of SQL injection. The prepared query is analysed as SQL, the data will NEVER be seen as SQL. So this situation can never occur because “bobby tables” will be considered data, not instructions.
Step 3: Read the result
When your query results in a number of records, as in the case of any “SELECT” query, then you can store the result of the .execute() method in a ResultSet variable.
Reading the ResultSet looks very similar to using the CSVReader. That is the way in which the following code works:
while (resultSet.next()) {
    String firstName = resultSet.getString("first_name");
    String lastName = resultSet.getString("last_name");
    int age = resultSet.getInteger("age");
    Date date = resultSet.getDate("birthdate");
    int number = resultSet.getInteger("number");
    // Do something with this data...
    Student result = new Student(number, firstName, lastName, age, birthdate);
	// Add to a list or something...
}
Finally
Once you’re done with your statement, please close it, so other users can read from that table:
statement.close();
Conclusion
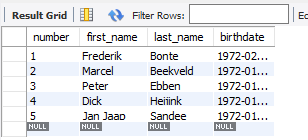
To ensure that I haven’t made any mistakes, this code segments allows me to read data from my personal test database from MySQL:
package nl.saxion.sdp.exercises.serialisation;

import java.sql.*;

public class Main {
    public static void main(String[] args) throws SQLException {
        String url = "jdbc:mysql://192.168.1.1:3306/students?user=frederik&password=Frederik&ssl=true";
        Connection conn = DriverManager.getConnection(url);

        String query = "SELECT * FROM student WHERE first_name LIKE ?";
        PreparedStatement stmt = conn.prepareStatement(query);

        stmt.setString(1, "%er%");

        ResultSet result = stmt.executeQuery();
        while (result.next()) {
            int number = result.getInt("number");
            String firstName = result.getString("first_name");
            String lastName = result.getString("last_name");
            Date birthdate = result.getDate("birthdate");
            System.out.println(number+" : "+firstName+" "+lastName+" "+birthdate);
        }

        result.close();
        stmt.close();
        conn.close();
    }
}
Running this code segment results in the following output:
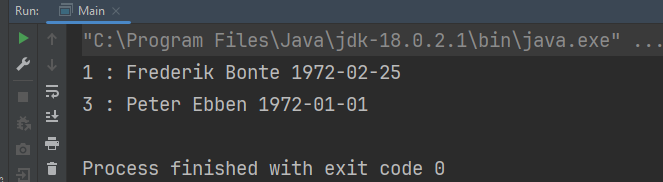
Note: Connecting to a database allows you to query individual tables, or, through joins, multiple tables. The way these tables interact through foreign keys is something you must handle for each query. When some tables represent your datamodel, for instance the students that belong to a group of students, you must first load the students you need and separately add the to the “class” object…
The complete data structure of a class (of students) can be read through deserializing a file or through reading a JSON structure. You need to fill your “StudentGroup” instance by yourself when reading from a database.