1.4-Software-Development-Principles
Introduction to Unittesting
Why should you Unittest?
You may have noticed this over the past schoolyear:
- Software development is difficult
- Introducing bugs/mistakes is easy
To control these problem we want to encourage you to invest part of your development time to designing unittests.
- Tests give you confidence that (part of) your software is working as expected
- Designing tests forces you to think about your design.
- Tests will support you when refactoring you code becomes necessary.
When you write tests, you research and think, and often you prevent problems before even executing the tests.
When to write Unittest?
Write your test as soon as possible:
- Don’t wait until you can no longer get your program to work. (And you can’t figure out why.)
- Don’t write test only for code that does something difficult. (Also write it for methods that you find trivial.)
Tip from the professionals: At the end of the day, around 4 o’clock, don’t start a new difficult task. Invest the rest of your time today to write unittests. That way you can evaluate that what you did today and confirm that it meets the original requirement. (It also gives you a moment to unwind.)
Thinking about tests makes your design (and code) better:
- Does your code come up with the correct answer?
- Does your code do unexpected things when you give it unexpected values?
- Evaluate what you intended, and confirm that all those assumptions are met.
Apply Test Driven Development
You can even write tests before anyone starts writing the actual code! This is called Test Driven Development. (TDD)
How to Unittest (automatically)?
![]()
JUnit is a testing framework that allows you to automatically run all the test methods that you wrote. In these methods pieces of your code are used and the resulting answers are checked against the results that you would expect.
Each test should test a single task by itself. The order of tests is not guaranteed. So you cannot use the result of one test to continue another test. In the end you will be presented with a report for each test. Preferably all tests succeed, but if someone in the team made a mistake, some tests will show up as failed. This will help you determine the problem:
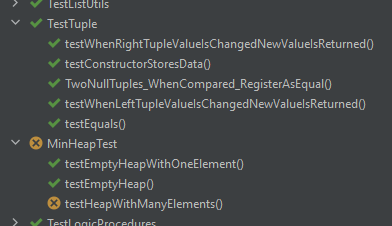
This partial report shows the classes that contain test code: TestTuple and MinHeapTest.
(Yes naming conventions here are a subject of ongoing discussion. Make sure that it is clear
what each test function is for.)
In this report it is easily shown that all tests that were designed for TestTuple have
executed successfully. Whereas the MinHeapTest class contains one test method that failed.
This gives us a point to start investigating.
Writing code for testing
The principle concept of unit testing is to add code to your project that is written for the sole purpose of confirming that the main code functions as designed. To get started with this, it would mean that for each method you wrote, you also write at least one test method that confirms that it works as expected.
A simple example might test the function that calculates the surface area of a rectangle. To test this method you will probably provide it with some values and confirm that for all of those possible values the correct surface area is returned.
To satisfy your curiosity we provide an example of such a test function. Please don’t worry about the details yet:
class Rectangle {
	public static int calculateSurface(int height, int width) {
		return height * width;
    }
}

class TestMathUtils {
	@Test
	public void CalculatingSurface_ReturnsTheCorrectValues() {
		// Prepare some data.
		int width = 5;
		int height = 3;
		// Do the calculation.
		int answer = Rectangle.calculateSurface(width, height);
		// Determine the correct answer separately from the code.
		int expectedAnswer = 15;
		// Confirm that both answers are equal.
		assertEquals(expectedAnswer, answer, "Surface calculation is not correct.");
	}
}
The code example above supplies a test that confirms that the surface calculations works as expected.
But unit testing can do much more:
- Confirm that after construction of your object the correct values are returned by your getters.
- When setting a new value, confirm that that new value is returned by your getters.
- When providing illegal values (which would cause an exception) confirm that the correct exception is actually thrown.
- Measure how many lines of your code are tested by all your unittests.
- Check that all paths within
if-then-elsestatements are used. - And more!
Limits of unit testing
Unittest are intended to test small segments of your code, through code. Something you cannot do is test that when the user presses a button on the screen, the program responds correctly. The activity of user is not part of the unittest. Another thing you cannot confirm is that the method for drawing a triangle on the screen, draws the correct triangle. (Or a triangle at all.) The unittest has no eyes.
This is handled by user tests and integration tests.
Your goal when writing unittests is testing all parts of your program separately and independently. When done correctly, you may be confident that when all those parts work together they function as expected as well.
Additional uses for unit testing
Sometimes as said in previous lessons, it becomes necessary to refactor your code. (Imagine that you come up with a new way to calculate the surface of an area) When the interface is unchanged, the same unittests can confirm that the new version of the code still works as originally designed.