Inheritance
Competence: I understand the concept of inheritance and can apply its principles to avoid code duplication.
Introduction
The past few weeks (and in the earlier module Introduction to Programming) we have been modelling all kinds of “things” in classes, such as books, persons, trains, dice, cars, planes, etc. These classes have all been given their own functionality, and you might have noticed that a lot of this functionality was repeated on a regular basis.
Now suppose that you are creating a personnel administration system for a university of applied sciences (e.g. Saxion). In this system, you will probably use “Student” instances to represent students and “Teacher” instances to capture the data of teachers. Much of this information will probably be stored in a similar way: both a teacher, and a student are likely to have a name, an address, etc. The associated functionality (setting this name, getters / setters to do something with a name, checks for invalid ages, etc.) will therefore probably be largely identical.
This week we’re going to look at how to capture this kind of similar functionality in so-called superclasses. In the example of the student and teacher, you could think of introducing a new superclass “Person”, where this class contains the shared functionality (name, age, etc.) so that you don’t have to repeat this code in your own classes for a student and teacher.
Thinking about your code in this way, with the focus on storing functionality centralized so that you can easily use it in other classes, without having to duplicate the code is called inheritance in object oriented programming. And that is this week’s topic!
Inheritance
The idea of inheritance is relatively simple: Code with certain functionality that you want to use in multiple classes is moved into a class that will serve as a base for writing your own classes. Consider, for example, the example from earlier where you write a system with teachers and students.
public class Teacher {
    private String firstName; // This line can also be found in the Student class
    private String lastName; // This line can also be found in the Student class

    private String teacherCode;

    public Teacher(String firstName, String lastName, String teacherCode) {
        this.firstName = firstName; // This line can also be found in the Student constructor
        this.lastName = lastName; // This line can also be found in the Student constructor

        this.teacherCode = teacherCode;
    }

    // These 2 getters are duplicates from the Student class
    public String getFirstName() {
        return firstName;
    }

    public String getLastName() {
        return lastName;
    }

    // This getter is unique to Teacher
    public String getTeacherCode() {
        return teacherCode;
    }

    // Omitted the rest...
}
public class Student {
    private String firstName; // This line can also be found in the Teacher class
    private String lastName; // This line can also be found in the Teacher class

    private int studentNumber;

    public Student(String firstName, String lastName, int studentNumber) {
        this.firstName = firstName; // This line can also be found in the Teacher constructor
        this.lastName = lastName; // This line can also be found in the Teacher constructor

        this.studentNumber = studentNumber;
    }

    // These 2 getters are duplicates from the Teacher class
    public String getFirstName() {
        return firstName;
    }

    public String getLastName() {
        return lastName;
    }

    // This getter is unique to Student
    public int getStudentNumber() {
        return studentNumber;
    }

    // Omitted the rest...
}
Note that the attributes firstName and lastName appear in both Teacher and Student. The relevant code for these attributes (constructors, getters / setters, etc.) is most likely very similar (or even copied).
However, suppose there is a small bug in the constructor of the Student class regarding the firstName attribute (e.g. we require the first name to be capitalised). Then most likely there is also a problem in the Teacher class, since the code is duplicated.
The idea of inheritance is now to define a class Person (after all, both teachers and students are also people) and store this communal code in it. The class Person could then look like this:
public class Person {
    private String firstName;
    private String lastName;

    public Person(String firstName, String lastName) {
        this.firstName = firstName;
        this.lastName = lastName;
    }

    public String getFirstName() {
        return firstName;
    }

    public String getLastName() {
        return lastName;
    }

    @Override
    public String toString() {
        return firstName + " " + lastName;
    }
}
By storing the common code in the Person class we can now modify the Teacher and Student classes by stating that they are actually extensions of the Person class. The functionality of Person remains, but we can add elements to it, e.g. the student number or the teacher code.
For this we will have to use inheritance. The classes Teacher and Student will inherit functionality from the class Person.
Applying inheritance: extends and super
You can let a class inherit functionality by using the keyword extends. Let’s use the class Teacher as an example. The new class Teacher, which inherits functionality from the class Person, now looks like this:
public class Teacher extends Person { // Note the "extends Person" part!

    private String teacherCode;

    public Teacher(String firstName, String lastName, String teacherCode) {
        super(firstName, lastName); // Note this "super(...)" call!

        this.teacherCode = teacherCode;
    }

    public String getTeacherCode() {
        returns teacherCode;
    }

    @Override
    public String toString() {
        return super.toString() + " (" + teacherCode + ")";
    }

    // Omitted any other Teacher specific methods
}
The first thing you might have noticed is that the first line (class definition) now includes the word extends. This word is used in Java to indicate that this class is an extension of the class mentioned after the word “extends”. So in this case you can read it as the class Teacher is an extension of the class Person.
With this addition, the functionality from the class Person is automatically made available to the class Teacher. You can now call the getFirstName() and getLastName() methods directly from your code, even though they are not defined in the Teacher class.

Note that some methods that you have created are not shown in a bold font. This is because the methods are not directly defined in the class Teacher, but in the class Person.
You will also notice that the constructor now looks a little different because it now includes the word super(..). Because the Teacher class is an extension of the Person class, the Teacher class has to make sure that the Person class can be created properly. In our example, a Person can only be created if it is provided with a firstName and lastName (see the constructor of Person). The Teacher class therefore also has to meet this condition. In this case we choose to give the class Teacher itself also a constructor which has a firstName and lastName and pass it to the constructor of Person by making the super(..) call.
The Person class is in this case also called the superclass of the Teacher class. So a Teacher is nothing but a Person instance, with some extra information (in this case the teacherCode). Since the class Teacher will not store the firstName and lastName itself (this functionality is in Person), this information still has to be passed on the constructor of the superclass. Conversely, we say that the class Teacher is a subclass of Person.
Finally, it is important to know that the super(..) call must always be the first instruction in a constructor: Before you can further develop an instance, you must have set up the basics (read: superclass) properly. So you always must call the constructor of the superclass via super(..) first.
Besides the super(..) method, every class also has a super attribute. This attribute is used in the toString() method above. In this case we will use super to call a method from the class we are inheriting from. So the best way to read the toString is to use the result of the toString method from the class Person and add a piece (the teacher code) to it.
Let’s do the same thing again for the class Student:
public class Student extends Person {

    private int studentNumber;

    public Student(String firstName, String lastName, int studentNumber) {
        super(firstName, lastName);

        this.studentNumber = studentNumber;
    }


    public int getStudentNumber() {
        return studentNumber;
    }
}
Note that we are actually using the same pattern: With extends we indicate that the class Student is an extension of the class Person and so the first line of the constructor must call the constructor of the superclass by means of the super(..) method. Since the constructor of Person expects a firstName and lastName we choose in this case to use these arguments as parameters for the constructor of Student as well. In this case, we leave the toString() method for now, we will come back to it later!
Of course, you can do this differently! With the super(..)-call you may also give your own value:
super("Bob", "The Builder");
(This is a bad example. In this case, all students would be called “Bob The Builder”).
However, there are examples where this solution is very useful. We’ll cover these in some of the assignments.
Inheritance and encapsulation: public, private and protected
At the beginning of the module, we introduced the word private which you can use with both instance variables and methods to indicate that “outside access” is not desirable. A private attribute therefore often had to be provided with getters and setters.
But what about inheritance? Since the class Student is an extension of the class Person you can say that a student is “also” a person and therefore you need to be able to access the attributes of Person (i.e. firstName and lastName) directly.
If you want to achieve this in your code, Java has the keyword protected. Next to private and public which you have you have seen before, this is a term you can use in combination with your own attributes and methods.
By adding the word protected to an attribute you declare that for subclasses (i.e. classes that inherit from this class) the attribute must be approachable (without getters / setters), but for other classes it is not.
Now suppose we adapt the class Person a bit and make the attributes firstName and lastName protected, then this looks like this:
public class Person {
    protected String firstName;
    protected String lastName;

    // Omitted the rest
}
In this case, in the classes Teacher or Student, you do not need to retrieve the name via getFirstName() or getLastName().
To demonstrate this, let us implement the toString() method for student:
public class Student extends Person {

    private int studentNumber;

    public Student(String firstName, String lastName, int studentNumber) {
        super(firstName, lastName);

        this.studentNumber = studentNumber;
    }


    public int getStudentNumber() {
        return studentNumber;
    }

    @Override
    public String toString() {
        return lastName + ", " + firstName + " (" + studentNumber + ")";
    }
}
Caution: The use of protected variables opens up your code again to possible errors which you try to avoid with encapsulation. Be careful which attributes you want to make protected and which ones are better kept private. As a rule of thumb: you want to keep as many attributes private as possible. If you cannot do this, consider protected before considering public. If you cannot think of any reasons to use protected and you are sure public is not the way to go, please use private.
Overriding methods
In addition to being able to add specific attributes and methods through inheritance, it is now possible to override existing behaviour. If you add a method to a subclass that is also defined in a superclass, the implementation of the method will be overridden by the subclass. An example:
public class Shape {
    // No more details are shown as this is one of the exercises.

    public double getArea() {
        return -1; // We don't know how to calculate this of a generic shape, so we'll just return -1!
    }

}
public class Rectangle extends Shape {
    private int width;
    private int height;

    // No more details are shown as this is one of the exercises...

    @Override
    public double getArea() {
        return width * height;
    }

}
In the above example, we override the getArea() method from the class Shape by the implementation of the getArea() method from the class Rectangle. This offers you the possibility to provide a more detailed implementation of a method, without having to create a separate method for this!
However, it is important that you use the same method signature when overriding methods, i.e. the method must have the same name, expect the same arguments and have the same return type. Only if these conditions are met we speak of a method override.
It is rather easy to make mistakes here. That’s why Java has come up with the annotation @Override (maybe you’ve seen it before, e.g. with the toString() method) to help you with this. The @Override annotation ensures that the compiler knows that you are trying to override a method and will check which method you are actually overriding. If that method cannot be found (e.g. because you entered the return type incorrectly), an error message will be returned. In short: @Override helps you to make sure that you override properly!
What you should be aware of when overriding methods is that it is not possible to disable functionality. So you can’t create a subclass with fewer (public) methods than the superclass. (This is also where the word “extends” comes from.) If you want a subclass to not have a certain method, then you have to make sure that the superclass doesn’t offer it or choose not to inherit from that particular class.
Class diagrams and inheritance
Introducing inheritance potentially creates a problem with keeping track of exactly how your classes are connected. Take the example of the Student and Person classes from earlier: It’s easy to find that the class Student inherits from Person - you can see this on the first line of the file you’re working in, but vice versa is a lot trickier. There is no easy way to see what classes inherit from the class Person.
Fortunately, class diagrams are here to help! Based on the (open) arrow, you can recognize that the class Person now has two subclasses: Teacher and Student.

A little more explanation is in order: The class Person contains the attributes firstName, lastName and their associated getters. It also contains a standard toString() method. Finally, you can see that the constructor cannot be left empty (to enforce that the name is properly filled in).
From the class Teacher you can see, by the arrow, that it is an extension of the class Person. This extension is the attribute teacherCode and the associated getter getTeacherCode(). Finally, you see that the toString() method is overridden in the class Teacher. You indicate this by naming the method also in the class Teacher.
We’ll leave the explanation of the Student class to you!
Organising your own classes: Packages
The number of classes you’ve started using over the past few weeks is getting bigger and bigger. It is therefore a good idea to take a look at how you can structure classes in a logical way. In Java, we often make extensive use of packages to arrange classes in a certain way. Most programming languages have such a construction, sometimes under a different name (C# calls it namespaces).
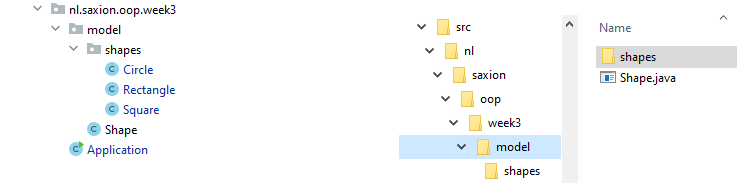
A package is in fact nothing else than a certain folder structure, see also the picture below.
(Packages are easily created in IntelliJ by right-clicking on a folder and instead of “New –> Java class”, click on “New –> Package”. IntelliJ takes care of creating a folder on your hard drive.)
Whenever you use a class (e.g. by importing or initialising it) Java uses the so-called fully qualified class name of a given class. In the case of the Shape class and subclasses shown in the image above, the fully-qualified class name
is nl.saxion.oop.week3.model.Shape and the corresponding subclasses are nl.saxion.oop.week3.model.shapes.Circle, nl.saxion.oop.week3.model.shapes.Rectangle
and nl.saxion.oop.week3.model.shapes.Square.
By adding the package part of the name, it is possible to give certain classes the same name. Java for example also has its own class Rectangle in the package java.awt. So the full name of this class is java.awt.Rectangle, which is different from the Rectangle in the image above. So by adding a package to the full name of a class, it is thus possible for Java to distinguish between these classes.
It is very common to include in your package name something that identifies you as the developer. Often a reverse domain name is used for this. By prefixing our packages with nl.saxion.oop we can indicate that these classes belong to this course (which is a Saxion course). In companies, we often see constructs like com.company.MyClass.
From now on, we recommend that you also use packages to store your code in a structured way. There are not many guidelines, except that it should be easy for you (as programmer) to find your classes. Therefore, choose clear names for your packages and any subpackages.
Packages and encapsulation: package private
The use of packages also affects (to a limited extent) the encapsulation of a class. And just to make things a little more confusing, Java behaves somewhat differently from other programming languages in this respect. In the table below, we have indicated when attributes can be seen by other classes.
| Modifier | Inside the same class | Inside the package | From a subclass | Outside class |
|---|---|---|---|---|
| public | Yes | Yes | Yes | Yes |
| protected | Yes | Yes | Yes | No |
| default | Yes | Yes | No | No |
| private | Yes | No | No | No |
(Note: An Outside class is a class that is not in the same package as your class and does not inherit from the class you refer to.)
You already know some of these access modifiers (public and private) and this week we introduced protected as well. Public attributes are always editable by all classes, regardless of whether they are subclasses of these classes or are in the same or different packages. Private attributes are never editable. Not even by subclasses.
Protected attributes are attributes that can only be used within subclasses. However, this is not entirely true. All classes in the same packages as the class with the protected attributes can modify them at all times. (This is often not the case with other programming languages. We can’t explain to you why this choice was made.)
The last option (default) is the one you used a lot in Introduction to Programming. Here, you just leave out the access modifier, as in the case of:
public class Student {
    String firstName;
    String lastName;
}
Videos


